

Today is the 14th day of this baking marathon and can’t believe we have reached half way mark. To check out all the recipes I have posted thus far, check here. Coming to today’s bake, fourth bread in this week’s bread baking series, I have a German potato bread that I bookmarked when Priya posted it few months ago. Initially I was skeptical of the bread and wondered how potato would taste in breads. After thinking it over, I went ahead trusting my eyes; pictures that Priya had put up. Bread looked soft and had a nice texture. I am glad I did. The bread was delicious and it was my dinner and breakfast the next day. It was probably lunch as well, I do not remember. Bread can be served with some butter & jam or with some soup or gravy. I ate mine with some curry.
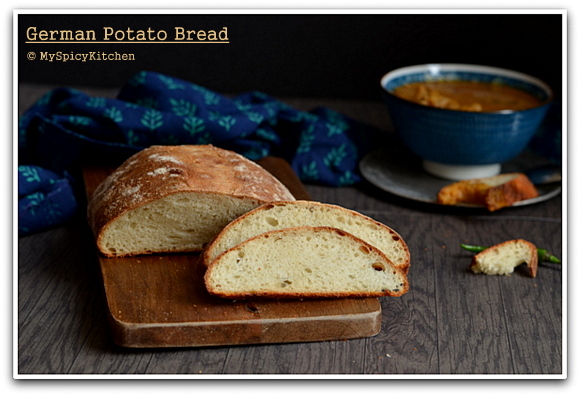
Photography Corner: As promised, here is a photography session today. The day I baked this bread, it was bright and sunny. I took these pictures in the evening when there was enough natural light to take decent pictures. My bread had this rustic look and wanted to do a dark or a moody photo. I do not know if these photos will fall in moody category but my intent was to make it look moody and give it a rustic feel. I used dark background and backdrop, and carefully picked dark color props. I initially picked an aluminum vessel to serve the soup/gravy since I wanted to give that rustic feel to the setup. You can see that picture here, though it is not a moody picture at all. The vessel was too bright and changed it to dark blue bowl. I was not sure if this bowl would work as it has a white interior, but I think it worked quite well with this setup. I used this dark blue piece of fabric that I had picked up from India during my last visit. I normally would not have bought that fabric as the print was just blah. The reason I bought was it is a dark color and it was a cut piece on discount. Did not know if I would use it but picked it up as it was just Rs.20, I think. I think it worked well in this setting.

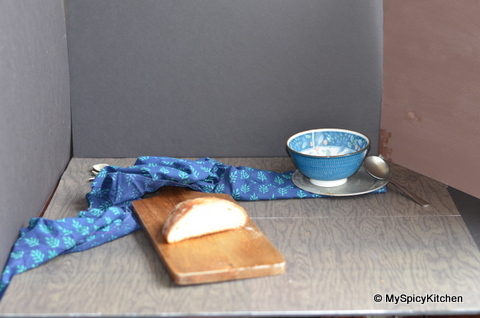
Settings – I used prime lens 50mm/f1.8 and manual settings; f/2.8, shutter 1/60, ISO 100 for the vertical picture and ƒ/4.5, shutter 1/30 &ISO 100 for the horizontal picture. Since it was a sunny day, I set White Balance to “Sunny”. The setup was next to a window light coming from the right. I used a black board as a reflector and a dark colored board to partially block the light coming from the right. Behind the scene picture below was taken the following day as I had not removed the setup after taking pictures.
Post Processing – I usually do very minimal post processing. The only processing I usually do is sharpen all the pictures in Picasa. For these pictures, I felt these were not dark enough and added a tiny bit of shadow using tuning features in Picasa. Later I was in two minds, as usually, if to use the ones with shadows or without shadows. Since I was looking for a rustic, moody setup, I went with the ones that added tiny bit of shadows. The picture below is without tuning/shadows and you might not even notice much difference unless you look closely. Hope you enjoyed this photography corner!

Below is the collage of step by step preparation. From top left to right;
— softly kneaded dough,
— dough after one and half hours rise
— floured surface to shape the bread.
From bottom left to right;
— shaped dough
— after second rise
— scored, and baked bread.

Source: I Camp in my Kitchen
Total Time: 2 ½ hours – 3 ½ hours
Preparation: 30 – 40 minutes
Rising Time: 1 ½ hours – 2 ¼ hours
Bake Time: 30 minutes
Yields: small Loaf
Ingredients:
- 1 medium sized Potato (about 190-200 grams)
- 160 grams (1 ¼ cups) All Purpose Flour
- ½ tsp. Active Dry Yeast
- ½ tsp. Salt
- 2 – 3 tbsp. Water (can use water used to cook the potatoes and I used only 2 tbsp.)
- 1 tsp. Oil
Preparation:
- Wash, peel and cut the potato into 6 – 8 pieces. Boil the potatoes until tender. Let cool completely and reserve the water in which the potatoes were cooked.
- To 2tbsp. of warm water, can use the water in which potatoes were boiled, add yeast and let it foam for 5-10 minutes.
- Mash the potatoes until smooth. Add flour, salt and mix well to combine.
- Add yeast mixture and knead the dough to make soft dough. Add oil while kneading.
- Once the dough holds shape, transfer to a flat surface and knead for 8-10 minutes to get smooth dough. I kneaded the dough on my countertop. Don’t be afraid of the kneading time. It is actually very relaxing. Forget everything, close your eyes and let your hands do the work. Trust me on this, I was going to knead the dough for 5 – 8 minutes and went on kneading for about 10 minutes and did not want to stop.
- Rest the dough in a well-oiled bowl for an hour, until it doubles. I let it rest for 1 ½ hours as I was not sure if mine doubled in volume in 1 hour.
- Once it doubles, transfer to a floured surface and punch the dough down and shape it. Flatten the dough to 1” thickness, bring the 2 sides up to the middle and lightly pinch it to seal. Sprinkle some wheat flour or all-purpose flour on the outside of the loaf. This shape and sprinkling of the flour gives the loaf a rustic look. OR just shape the dough into a round ball or a rectangular loaf.
- Place it on a lightly oiled and floured baking sheet and leave to proof in a warm place for another 30 minutes. I was unsure if my dough rose, so let it proof for 45 minutes. After the disaster with my pizza bread, I did not want to take the risk of over proofing.
- Pre-heat the oven to 425 F (220C), during the final 10 – 15 minutes of the second rise.
- Score or lightly cut the dough near the pinched/sealed join. My score/cut was not deep enough and the bread did not quite open. Mind you, the cut should not be too deep either.
- Bake in the preheated oven, middle rack for 30 minutes, until the top is brown.
- Cool completely before slicing the bread. Serve with some butter, jam, soup or even some curry
My breakfast the next day, slices of bread with some mutton shorva. Picture taken with my phone.

This day in:
2012 – Aloo Kheer
2014 – Sabudana Vada from Maharashtra

Source link